Safeguard your Mac effortlessly with Time Machine backup – the go-to choice for automatic, comprehensive macOS system and data protection
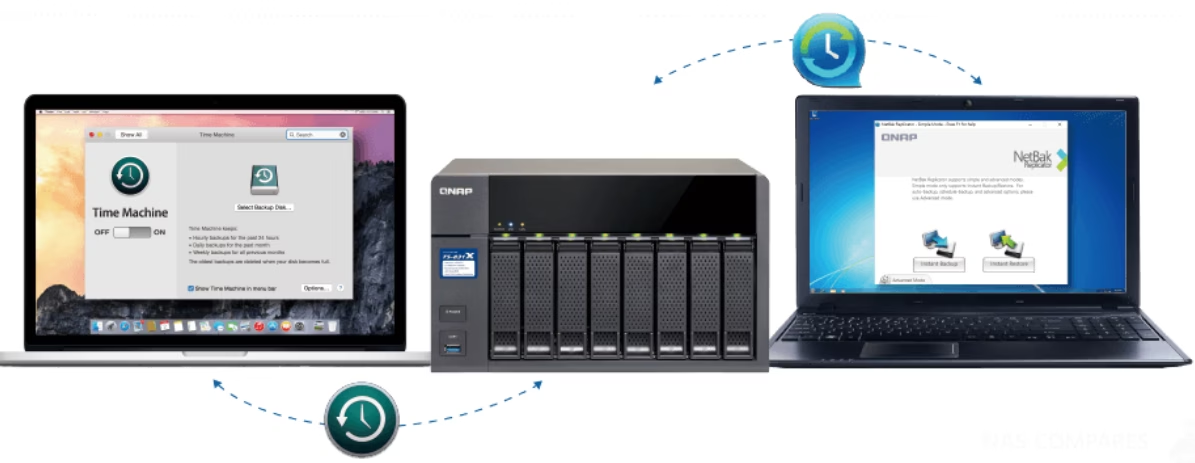
Time Machine for Mac is unquestionably the most convenient and straightforward backup option for automatically backing up the macOS system and your data, including programs, images, files, and more, for most Mac users. You can utilize an external hard drive, Airport Time Capsule, or a network device for Time Machine backups.
This article will walk you through creating a Time Machine backup to NAS. By carefully following the steps, you can save the Time Machine backups to an internet-shared folder for later restoration of your Mac and data.
How to Use Apple Time Machine with Your NAS
Apple Time Machine is a backup software tool with Apple’s macOS operating system. The program is intended to function with their AirPort Time Capsule devices, the Wi-Fi router with built-in hard disk (which Apple is discontinuing), and other internal and external drives linked by USB and Thunderbolt.
It was first included in Mac OS X Leopard several years ago and has since become a backup necessity for Mac users worldwide. With the growing popularity of Synology NAS devices and third-party clouds such as Google Drive, Amazon Drive, and CrashPlan, storing backup pictures of a Mac system off-site has become a regular requirement.
What is the process by which Apple Time Machine backs up my files?
Time Machine creates incremental backups of files that can subsequently be restored. It enables the user to recover the entire system or selected files from the macOS Install DVD or the Recovery HD. It works within Mail, iWork, iLife, and several other compatible programs, allowing you to recover individual items (such as emails, images, contacts, and calendar events) without leaving the application.
Similarly, storing data on a Synology NAS employs the same file transfer system but switches the transfer protocol (the method by which files are delivered) from internally to externally. According to an Apple customer service statement:

Time Machine allows users to back up Mac machines over the network and supports backing up to certain network-attached storage devices or servers, depending on the version of Time Machine. Earlier versions supported a wide range of NAS servers. Still, newer versions require the server to support a recent version of Apple’s Apple Filing Protocol (AFP).
Time Machine no longer supports servers that use the Server Message Block (SMB) protocol, which is common on Windows servers. I’m happy to report that Apple Time Machine is still supported on Synology NAS servers. I’ve described how to set up timemachine backups to a Synology network-attached storage device in your environment below.
Can you back up your Mac to a NAS?
You certainly can. According to Apple, Time Machine can be used with an Airport Time Capsule, a network-attached storage (NAS), or an external device linked directly to your Mac via a USB or Thunderbolt connector.
However, not every networked storage can hold Time Machine backups. Your network server or NAS device must support Server Message Block (SMB) or Apple Filing Protocol (AFP). Furthermore, some network disks manufactured by non-Apple vendors do not support Time Machine. You should contact your disk manufacturer to verify if it can be used for Time Machine backups.
How to Use Time Machine to Back Up Your Mac to a NAS
QNAP NAS and Synology NAS are network storage systems that allow users to create a private and centralised cloud storage for storing, accessing, backing up, and sharing files.
Because Synology NAS is now the most popular NAS provider, this post will primarily discuss how to back up to a Synology NAS with Time Machine. The procedure is likely to be identical to other manufacturers’ NAS systems and can be divided into two significant steps:
- Set up the NAS for Time Machine backups.
- Configure the Time Machine on the Mac to use the NAS.

Step 1: Set up the NAS for Time Machine backups.
- After logging into DSM with an administrator account, navigate to the Control Panel.

- On the toolbar, select Shared Folders and then click Create.
- In the Shared Folder Creation Wizard, click the
- Name: Enter a memorable name such as “Time Machine”, “Time Machine Folder”, or “Time Machine Backup”.
- Description: Include any information to help you identify the folder.
- Choose a storage volume/pool as the location.

- Press the Next button. It is NOT advised to enable the Recycle Bin feature and utilise encryption on the Synology NAS shared folder.
- Continue to click next or adjust the options in the Advanced, Permissions, Advanced Permissions, and NFS Permissions wizards until you reach the Confirm settings page.
- Finally, click Apply to finish setting up a shared folder for Time Machine backups to NAS.
- Return to the Control Panel and select File Services.
- Select Enable SMB Service under the SMB tab. SMB is the default protocol used by Time Machine on macOS Sierra (10.12) and later versions.

- Select Advanced, and then SMB broadcast Bonjour Time Machine is enabled. You can set up Time Machine backups even while you are not connected to the server if your network server or NAS device supports Time Machine Bonjour notifications.

- Select the Folders to Set Time Machine.

- Select the folder on your Synology NAS where you would like the Time Machine program to back up your Mac.
- You are done after you click Save to finish modifying the shared folder’s backup destination for Time Machine.
Step 2: Configure Time Machine to backup to your NAS.
- From the Apple Menu, select System Preferences and then Time Machine.

- Tick the box Show Time Machine in the Menu Bar for quicker access; select Back Up Automatically to have Time Machine regularly backup your Mac.
- Select the backup disk.

- Select the Synology NAS shared folder you created—for instance, Time Machine on your Synology NAS domain name. Check Encrypt backups if you want to encrypt your Time Machine backup to NAS. This will slow down your backup when you back up your Mac to NAS for the first time.
- Select Use Disk.

- Click Connect, then enter your DSM shared folder login and password.
- Click Connect, and Time Machine will immediately begin backing up your system and files.
Step 3: Restore files to NAS from Time Machine backup (optional).
If you mistakenly destroyed some files on your Mac and emptied the Trash can, you can restore your lost files using the Time Machine backup to NAS.
To restore data from backups on an external hard drive, connect to the NAS, launch Time Machine software, and move through your backed-up files using the slider on the right side of your screen. Then, please select the file or folder to be restored and click Restore to return it to its original location.
How to backup your Mac by cloning its hard drive:
- On your Mac, download and install DiskGeeker.
- Connect an empty external hard drive to your Mac and ensure that the destination disk has the same or more capacity than the Mac hard drive.
- Open the disk management application and pick the SSD on your Mac.
- From the right-hand toolbar, select Clone.
- In the pop-up, select the external hard disk and click Start Clone.
- After the clone is finished, remove the external disk from your Mac.
Also read:- Best NAS Software For Your Custom-Built NAS
Key Points to Remember
Consider setting a quota to avoid Time Machine using your NAS storage space. The quota should be at least twice the capacity of your Mac’s hard drive or three times the data you want to back up. This will help you maintain multiple devices and versions effectively.
If your NAS server supports the Btrfs file system, you can set usage quotas for individual folders. However, if it only supports the EXT4 file system, you can only set a usage quota for the entire volume.
Time Machine supports both SMB and AFP. If you’re using macOS Sierra or later, Time Machine uses SMB as the default communication protocol.
To back up your files using SMB, go to the SMB section on the same tab and check the “Enable SMB service” box. If you selected SMB in the previous step, click the “Enable Bonjour Time Machine broadcast over SMB” box, select the newly formed shared folder and click “Apply”. Then, click “Yes” in the popup window to confirm and preserve your settings.
Conclusion
This post will show you how to back up your Mac without external hard disks. Apple allows you to back up Time Machine to NAS. The preceding procedures appear to be complicated, but they are not. If you follow the instructions correctly, backing up your Mac to a network drive is simple.
Frequently Asked Questions (FAQs)– Time Machine backup
How can Time Machine work on a Mac without an external hard drive?
Finish configuring the NAS or network device and establish a shared folder.
On Mac, launch Time Machine and select the shared folder as the backup device.
Keep the NAS or network drive attached to your Mac, and the Time Machine will automatically and continuously back up your Mac.
How can I set up automatic file backups to a network drive?
How do I get Time Machine to work on my Synology NAS?
Make a Time Machine shared folder on your Synology NAS storage volume.
Set the shared folder to be the Time Machine backup folder.
Install Time Machine on your Mac to use your Synology NAS.