This post is for those folks who are thinking of to create the Wi-Fi Hot Spot in their home but are quite lazy to buy external Wi-Fi Router for the purpose. Well if you are also among the community looking for the same, do read this interesting post to know ‘How to create WiFi Zone in the Windows 7 even without a wireless router’.
Note: I assume that you have windows 7 laptop enabled with Wi-Fi already connected to the Internet.
Step 1
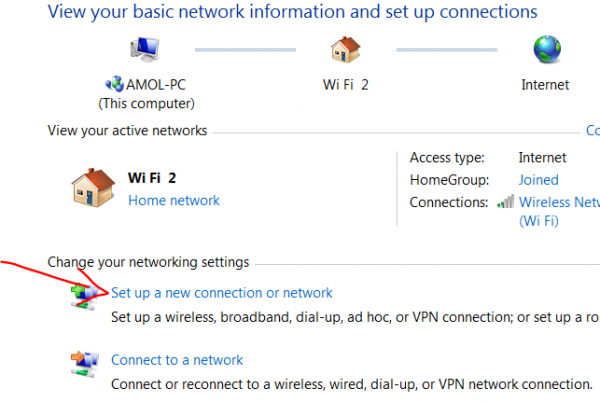
First of all, head on to the Windows Orb Button which you will find by default on the left bottom corner, then type the ‘Network and Sharing Center’ in the application search box, this will open a new dialog box with the URL: Control Panel/Network and Internet/Network and Sharing Center. IN this Window, look for the option ‘Set Up a new connection or network’. Just like show in the image below:
Step 2
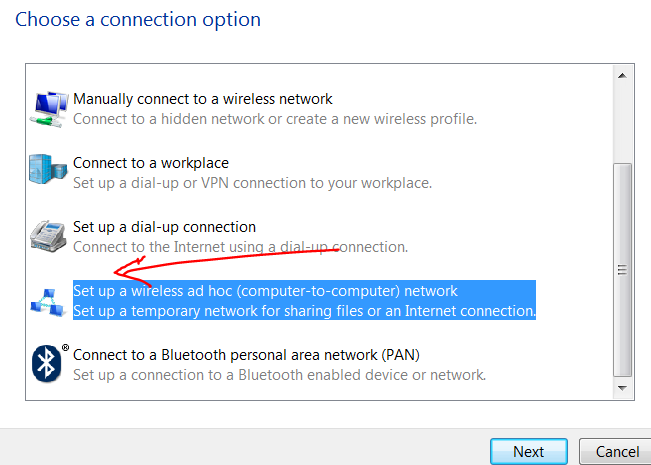
On clicking on the ‘Set up a new connect or network’, you will be directed to the window show in the below picture. Here select the option called ‘Set up a wireless ad hoc (computer-to-computer) network’ & then click on next to proceed to the further steps.
Step 3
You will see new simple wizard page for new connection.
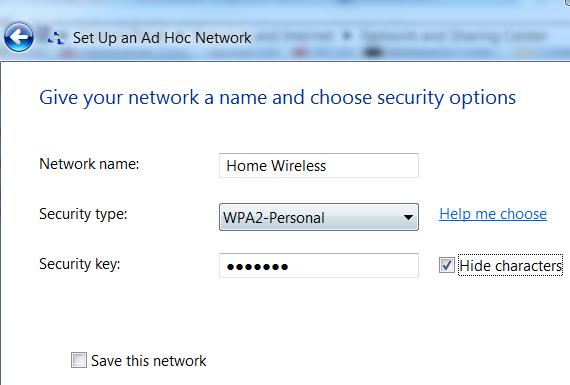
Step 4: On click on the ‘Next’, which will again open the new dialog box, where you will find fields like Network name, security type and security key to be filled by user.
- In the field ‘Network Name’, you have to enter the name of the network.
- In Security type, you have to select the WEP2-Personal
- In the security key, you can enter any alpha-numeric key which you can easily member, but should be strong enough to protect your wireless network from any kind of inception.
Step 5
Now tick on the ‘Hide Character’ and also on the ‘Save this network’ to save the entire setting for the future use.
Step 6
Now click on the option of ‘Turn on Internet connect sharing’ and head on to the close button. That’s it; Your Wifi Hotspot zone is now ready for the use.
Step 7
In case you do not see the button ‘Turn on Internet connection sharing’, then go to the Control panel>>>Network and Internet>>>Network Connections. Now select the modem which is being connected to the internet, this will open new dialog box, where you will see the properties of the selected network.
Step 8
In this window, tap on to the option ‘Sharing’ and check the button called ‘Allow other network users to connect through this computers internet connection’ and also the option ‘Wireless Network Connection’ comes under the drop box ‘Home Networking connection’.
Cool ! You are now done with the settings of the WiFi Hotspot and on successful configuration you can enjoy the privilege of WiFi Hotspot. In case you find any issues, reconnect the internet connection and hope it will resolve the problem. Furthermore you can also share your issues with us and we will be happy to figure out the solution to the issue.

